
EXECUTION: Ideas Made Material
This piece builds on Genesis, part-1 of a trilogy through building and riding my dream gravel bike, a custom T-Lab X3. In Genesis, I lay out how to think about a new bike’s relational role and use-case within nested ‘ecosystems,’ constituted by bikes and riders. Here, I write about the process of locking-in a ‘what’ and ‘how’ for a new build using concepts that come from my experience in the maritime sector, which pertain to the most complicated custom build processes I’ve ever encountered: shipbuilding. I focus more on the ‘generic’ details of my build, which emanate from specifics around my X3’s use-case. I don’t cover the particulars around my components; I’ll cover these in part-3, in the context of riding the bike through it’s first 18 months.
I begin with the creative part: imagining how you’ll live with your new bike. The concept of operations we develop for a new bike should probably be grounded in a realistic understanding of what makes a given bike ‘good’ for actual riding within the spectrum of circumstances it’s likely to see, versus ‘good’ on paper, or with respect to a particular aesthetic ideal. I use the concept of the ‘category mistake’ to elaborate this dynamic.
Custom bike builds are seldom characterized by certainty. They tend to combine elements in one or more novel way/s for a given rider, at least with respect to their cycling background; folks don’t often commission a custom bike that is supposed to be identical to a bike they already have or have ridden extensively.

Each rider brings certain ‘known-knowns’ to the table as they begin their custom bike journey, as does each builder. Gravel bikes are still relatively young in developmental or ‘evolutionary’ terms, and when compared to road bikes, many questions remain with respect to geometry and configuration. They are more analogous to mountain bikes in this regard, because both formats are designed to cover a broader use-case spectrum than road bikes.
I build out from foundational fit elements like saddle position, and discuss rationales for different approaches to hip positioning and weight distribution. From there, I dig into how seatpost, crank, stem and handlebar dimensions are implicated in a balancing of priorities. These component specifications are primary, which means they come before geometry decisions. This doesn’t mean they determine geometry; they drive setting limits, which is really important if we want to avoid finding ourselves saying, “Well, shiiiiitttttttt” down the road.
The piece is long enough already as I reveal the geometry specifics I went with for my X3 build. I don’t cover nitty-gritty configuration bits and bobs like cable-routing and headset format; I’ll detail these in part-3. These elements are more about personal preference than design principles.
Concept of operations
In my day-job, ‘concept of operations’ refers to how we imagine a future asset (like a ship, for example) will be operated: what it’s for, what it’ll do, where it’ll do it, for how long, with how many crew, etc.. This doesn’t usually begin with a blank sheet of paper, but an existing vessel, already operating, which will be replaced. In this case, we consider what the vessel has been doing through its life, how it has performed, whether its replacement will be expected/needed to do the exact same things, and how it might do these things better than its predecessor. Naturally, we have to factor changes in the operating environment to ensure the vessel will be capable of performing as required once it’s launched, and for decades into the future. But since we don’t have crystal balls, we can’t know what the future operating environment will ‘look like’ with much certainty. We’re pretty sure there will still be oceans, they’ll be energetic, and we’ll have to operate in harsh conditions.
Based on a given concept of operations (con-ops) we need to develop operational requirements (op-requirements) for a new build. These are the things that make the asset capable of doing what it’s supposed to do. If a given ship needs to be able to travel at a given speed over a given distance on one tank of fuel, these requirements drive specifications around propeller size, installed power, fuel capacity, hull-form, etc..
A bike isn’t really very different, except this process is significantly easier, since it’s just you, the rider, operating the thing; you get to be the captain! But for many riders, the con-ops won’t just be about solo operation/riding. It’ll more likely be ‘relational’; you’ll ride with other people. So the bike will be part of an ecosystem, and it will itself form an ecosystem of relationships between frame elements, components, the rider, and the rider’s kit. I cover some of this in the Genesis piece.
Defining your build’s con-ops
When we start imagining a new bike, which will become a new member of our personal ecosystem of bikes, it’s not necessarily ‘easier’ or ‘harder’ to create a con-ops when we already own one or 10 bikes. If one, the challenge most folks will face is dealing with the anxiety that the new bike won’t be able to ‘do all the things’ their existing bike is already doing, but better in degree and different in kind. Example: if I own one bike, a road bike, with rim brakes and clearance for 23mm tires, a lot of riding opportunities will be a no-go. El Camino: no-go. So I might want to get a new bike that’ll do ‘road bike stuff’, but better (right?), AND, do all that rad gravel stuff. Enter unicorn bikes, like the OPEN U.P., which is marketed directly to a rider who wants-a-sweet-bike-to-do-it-all: ‘Do it all, be awesome!’
For riders new to the sport, there’s so much going on in terms of riding styles and disciplines, which format of bike is ‘right?’ Add the complication of marketing – which isn’t really a factor in the marine domain example – and it has to be wildly confusing. In the case of new riders, a custom bike is generally not the place to begin; it’s best to get onto something you like the look of and figure things out as you go along. Be like a kid, it’s ok. However, for those who have ability challenges or constraints, such as limited mobility or radical leg and/or arm length discrepancies, a custom bike could actually be required off the bat to support comfortable riding. If you’re working with fit and conventional function and/or mobility challenges, I suggest you see a skilled bike fitter as soon as you can, and determine what you need from a bike in terms of fit accommodations, and build out from there. In the Ottawa area, I recommend James Van Toever.
For those with multiple bikes already, parsing out how to differentiate a new bike in a meaningful way can be challenging, especially when we’re talking about a new drop-bar bike that will live among various other drop-bar bikes. I’ll focus on the ‘gravel’ segment here, but if there’s demand, can write up other pieces, covering road, cyclocross, and mountain bikes, later on.
Gravel bikes and category mistakes
Gravel bikes are amorphous. As a category, they cross boundaries with multiple other categories, which is at the root of many a rider’s confusion. The trickiest part about designing and building up a gravel bike that feels ‘future-proof’ is imagining how the bike will live with other bikes in one’s collection, and influence the way we perceive these bikes.
The ‘worst thing’ for many folks would be building a custom bike that kept on being overlooked when deciding between bikes for rides. Now that’d be SAD! This can easily happen when bikes are what I call ‘category mistakes.’ This means they combine elements that conspire against each other to create a bike that sucks. No one element sucks, but when you put them all together, the bike sucks.
An example would be an enduro MTB with 35mm slick tires. This bike would SUCK, because it would do nothing well. When would you ride it? Never, it's a dumb bike. Yes, 35mm slicks are great for dirt roads, but 150mm suspension front and rear? Hard-no. And 150mm travel is RAD! on trails, but 35mm slicks? No chance.
This is an extreme example, but I’ve created my own category mistake bike when I experimented with drop-bars on my Niner MCR. First, I ran the bike with a rigid fork and crazy-light Schwalbe Furious Fred 2” 29er tires. Oh man, was that bike efficient on terrain we don’t have in the region I live: Cape Cod! Hell yeah, pine-needle trails with little roots; the bike was dope while I was on the Cape for vacation! But at home, while the bike felt fine riding to the trails, and was stable at speed, the tires were WAY too light to hit sharp rocks and not puncture. It was capable of going fast without being scary, yet incapable of doing so without puncturing tires. On slower, more technical trails, the drop-bars were a liability (this was pre-hydraulic road disc), and the tires were pretty scary. I tried heavier and more aggressive tread tires, which improved things in a couple obvious ways, BUT, rendered the bike annoyingly sluggish on pavement. And, it remained SCARY on technical trails, because the body position was ill-suited (and dropper posts didn’t exist for 27.2 frames). It was thus a category mistake, a jack-of-all-trades, master-of-none. I learned a lot with that bike.
Zooming out to the conceptual level, what went wrong with my Niner? How can the con-ops and ops-requirements lenses help us understand the category mistake?
On the con-ops side, I wanted a bike that could handle fast, wide-open terrain, anything from rolling to mega-hilly. The D2R2 long-route inspired the build, as I wasn’t happy with the tire volume I could fit into any of my existing bikes (maxed out around 40mm). I wanted to run a high-volume 650b bike for that sort of terrain (loose dirt roads, steep climbs, fast descents), but didn’t have wheels or a disc frame, except my Niner. I figured the Niner would help me test the high-volume tire concept.
The con-ops was fine – it’s still my con-ops for gravel bikes like the X3 – but my op-requirements were constrained by what I already had on hand and what the industry was making. I was ahead of my time, and there was a lot I didn’t like about the end-result. And since I didn’t have a MTB rolling (I’d converted it), I pushed the bike outside its con-ops, onto more and more technical terrain (I was experimenting….), which rendered some of its components totally inappropriate. I then adapted my op-requirements to fit the new con-ops, and landed on a set-up that sucked at everything.
There is no such thing as a ‘failed experiment’; I learned a tonne through my Niner trial. One of the elements I had working in my favour, a ‘control’, was my fit on the bike. It was a known-known.
Operational Requirements: known-knowns, known-unknowns
There were many elements I considered ‘known’ and ‘decided’ that guided my Niner experiment, and the design process for my X3. I touch on some of these in the Genesis piece, and elaborate here.
FIT and Function
Cyclocross bikes enabled ‘gravel’ platforms and riding to blow up once they shifted from rim to disc brakes. This increased tire clearance and opened the option to mount 700c and 650b wheels. 650b wheels pushed volumes to 48mm, which convinced folks on the fringes that high-volume tires were not ‘slow’. I was one of these fringe lingerers.
Many riders have owned cyclocross bikes, and dipped into gravel on them. From scene to scene, there are different trends regarding body position on CX bikes, which are driven by course design. The more technical CX courses are, the more upright and short CX fits are. Yes, there are exceptions, like MVDP, who ride long, low positions no matter what.
My ‘cyclocross’ fit evolved over the years; as I raced more and more outside my region I developed some insight around my crash trends. In a nutshell, when I lost front traction it was usually because I had too much weight on the front wheel, which is opposite of what normally occurs on MTBs. Once I figured this out, my thinking about cyclocross and non-paved bike handling started to evolve, and this landed me thinking about a more rear-weight bias.
My CX fit became shorter and higher over the years, and it’s been ‘validated’ through the execution of a few pretty serious bunny-hops (which started to become a necessary skill for racing a few years ago) and three seasons of racing. The position doesn’t feel great for extended periods of riding on roads, just like a mountain bike’s doesn’t.
On a ‘conventional’ cyclocross bike, I’d tend to be on a 110mm stem to get the reach I need from a 57cm-ish top-tube. This works fairly well overall, but I was never very happy with mud performance. In a nutshell, I began cyclocross on a 58cm frame, then rode a steep 57cm, followed by two custom Steelwools, the latter being a 59cm. That frame was VERY stable overall, and it solidified my preferences. However, it was impossible to fit 650b wheels to the bike (rim brakes), and moving to disc bikes meant I had to go off-the-shelf, foregoing the custom geometry option that would allow me to combine long top-tube with short head-tube. I went ‘all-in’ with my Brodie Romax aluminum race bikes, embracing a much shorter and slightly higher bar position than I’d previously used, which I coupled with a 35mm set-back post. This allowed me to shift my weight bias back and retain a little extra room between hips and hands.
Over three seasons on Romaxs with this position, I confirmed that I liked it. Bunny-hopping barriers was becoming ‘necessary’ in races outside my local series, and I was able to hop the set-up better than all my previous CX bikes. I didn’t feel mud performance was amazing; it seemed like a trade-off.
I rode my two Romaxs with 700c and 650b wheels. For trails, I ran 650b x 48mm tires, which set the bike at the same height as with 700c x 33mm tires. During cyclocross season I rode with 650s on one bike through the week, the other with my 700c CX wheels, for trails/all-road and CX training, respectively.
My primary beef with my CX position was that it wasn’t stable enough on rough descents. Pointed down, my hips and centre of mass were too close to my front axle. I’ve learned over the last 15 year of riding drop-bar bikes off-road that the margin of error is much narrower than on MTBs of virtually any description. While travelling at speed, a drop-bar bike can feel phenomenal, even euphoric. However, when impacting obstacles, be they protruding from the ground, or holes, fore-aft stability can be lost in micro-second. There is normally a very small/short effective window of operation for the knees and hips. When we strike whatever with the front wheel hard enough, our range of motion to counteract our body-mass rapidly thrusting forward is limited by our reach to our bars and the bend at our elbows. Huh?
If I ride a conventional CX bike down a rutted descent with a 110mm stem on it, I will EJECT unless I maintain a very dynamic posture over the bike: significant bend at the elbows, bent knees, hips back. My front knee will have to remain behind my pedal axle if/when I slam stuff, otherwise I will likely go over the bars. Why? Because I won’t be able to ‘push back’ against the impact with my feet; all I’ll have is my arms.. But my arms are bent - otherwise they have zero range-of motion to push my mass backwards - which puts a lot of my mass over my front axle in the first place. So from the get-go, by virtue of adopting an ‘attack’ or ‘dynamic’ posture, I necessarily increase the impedance-factor of any frontal impact. It’s not viable to descend with straight arms in order to keep the weight back. Am I painting a picture here? The relation of my shoulder position to front axle is good for actual roads and cyclocross courses without all sorts of wild impacts, but totally crap for steep trails.
What can I do? If I mount a shorter stem, my posture while standing will be a bit better, as I’ll be able to maintain a decent arm bend while standing, and my hips will be proportionally further back. But my front axle will not have moved, overall, and when I ride fast terrain, like an actual road or wide-open trail, my reach will be too short.
This is where my custom frame comes in. I know where I want my hips to be for pedaling, and I know where I want my hands to be for a mix of all-conditions riding. I know that my CX effective reach and drop works for me for bunny-hopping and handling technical terrain, but I don’t like that effective reach and drop accomplished with anything shorter than a 58cm top-tube. Thus, I wanted to push my top-tube out to 59cm, drop my stem to 90mm in length, and replicate my CX position, while having my front axle more than 2cm further forward.
Fit: Known-knowns about components
Some component decisions impact frame geometry decisions. If you are certain you’ll want to maintain the same con-ops for a given bike through its lifetime, you can work around a few components as essentially ‘fixed’. I’ll elaborate below.
SEATPOST I could run either a 25mm or 0mm offset seatpost to get my hips where I wanted; there would be flexibility around this spec.
For cyclocross I run 25mm saddle set-back, perhaps more (Specialized C-GR post).
For a ‘full-road’ position I prefer 0mm offset.
25mm + equates to a more rearward weight bias, which has to be accounted for up front (bars need to be positioned back).
Some saddles require a specific post offset to provide the range of adjustability you need, so if you’re planning to use a new saddle, check.
Seatpost specification implicates seat-tube angle. I know that 73-degree STAs allow me to position my saddles wherever I want them with either an offset or non-offset post.
I planned to run a static post, but knew I’d want to run a dropper when the opportunity arose.
CRANKS: I would run 172.5mm cranks, as I like where they position me in terms of ride-height and centre-of-mass across wheel sizes.
Cranks are a fit element, primarily, and a stability element, secondarily (ride-height, centre-of-mass).
The more you lower your trunk toward horizontal, the more you benefit from a short crank, as it determines the hip-angle you wind up with.
I run 172.5mm cranks on all my drop-bar bikes. I moved away from 175mm after I’d been riding in low, aero positions for a few years, and wanted to better enable this.
Crank length needs to balance your priorities. This bike wasn’t intended to be a long-hauler from the outset, but I wanted to maintain that option when configured differently. With bars positioned at CX height for trail riding, this bike would have a fairly upright position compared to my other formats. Thus, when covering open roads, especially in the wind, I’d likely wind up riding in the most forward, low position possible: ghost aero (forearms on flats). This position closes the hips up, as a time trial position does. If I wanted to be able to ride this position comfortably and efficiently often, a 170mm crank would help, as would a 165. 170 would make an incremental ride-height change, requiring a higher saddle position, and also slightly increasing reach. If I were to eventually go as ‘extreme’ as 165mm on the bike, I’d need to shift my saddle up and back. This would tend to be easy to accomplish with an offset seatpost. This adjustment would increase reach to the bars. So, for a use-case where I’d want to ride many hours as aero as possible, I’d not reduce stem length in proportion; I’d wind up with a longer-reach and a more comfortable low-torso at the same time. If I wanted to keep reach as it was prior, a proportionally shorter stem would shift my weight-bias back.
Ride height isn’t just about centre-of-mass, which affects handling across horizontal and vertical planes, but also your reach to the ground as you sit on the saddle. As the bike’s angle decreases from 90-degrees, at any speed, and we reach the critical point of needing to place leaning-side foot onto the ground to push back up to vertical, millimeters matter. At speed, a slide that creates this lean can be saved by pushing off the ground before the lean-angle is too extreme to save. The higher we are off the ground in our seated position, the more severe the lean must be before our foot can even hit the ground. The lower you are, the sooner you catch your lean, the more likely you are to prevent crashes.
Dropper posts change this equation whenever we are able to reduce saddle height before an extreme lean occurs. This could be on slow, technical terrain of the sort that often leads to awkward, slow tips over, and/or high-speed descents, where we’ll want to drop the saddle for increased mobility and control. If you intent to run a dropper, and you want to use a short crank, just keep in mind that you might want to swap to a longer crank if/when your dropper is out of commission for whatever reason.
STEM: I wanted a ‘short’ stem on the X3, more akin to a mountain bike than a conventional drop-bar bike; 90mm was my aim.
Stem length drives a bike’s handling significantly, and it’s a component that probably shouldn’t be ‘locked in’ across all the drop-bar formats one might ride, because it drives top-tube length and the rider’s weight distribution over the wheels. A road bike, for example, places relatively small tires onto a relatively stable and grippy surface: pavement. A gravel bike places much larger tires onto an unstable surface: dirt and gravel. One tire is expected to spend most of its time gripping, while the other is expected to spend much of its time sliding. Different front-end geometries work well in each case, and changing stem length influences them. In short, a 140mm stem can work really well on a road bike, but would be pretty terrible on a gravel bike, because the top-tube on the latter would have to be very short to make that length work in terms of fit, and the weight bias would thus be all over the front wheel, which is opposite what works well for handling the bike on loose terrain.
A short stem, in this context, would increase leverage over the front tire’s contact patch, and reduce the influence of steering on the head-tube. This matters when front traction is lost. The longer the stem is, the more the headtube ‘swings’ in the direction of a slide, which amplifies the slide. A short stem allows a slide to barely affect the bars, which translates to greater ability to correct and not crash.
As tires increase in size (volume), they influence handling. Anyone who’s ridden a fat bike will know that a 4.5” tire at 3 PSI can feel perfect on snow that is fairly well-packed, but not ‘hard.’ Transitioning onto hardpack or pavement, that same tire will feel INSANE. It will grip the ground too much and oversteer as the front rim literally shifts within the tire as the rubber tracks over the ground. The SAME THING happens with high volume tires on any other bike, but it’s less pronounced than on fat bikes.
The upper-end of tire volume you intend to ride on your custom bike should inform your upper-end stem length, because increasing tire volume up front ALSO
BARS: I would use 42cm or at most 44cm bars. I wasn’t sure which I’d prefer, given I’d use a shorter stem than ever before.
As bars get wider, leverage over the stem and steerer tube increases, while steering input translates into less actual wheel movement. Meaning, wide bars mute steering input, and also mute the influence of wheel deflection on the ground.
As bars get wider, shoulders are pulled closer to the front of the bike, which thus shifts weight-bias to the front. This can be compensated for with a shorter stem, which creates more ‘direct’ steering, which is fine, because the wider bar reduces ‘directness’; you ban break even.
As bars get wider, your range-of-motion decreases. This means the distance you can move your body back and forth in relation to the front wheel decreases. An extreme example: 140mm stem with 48cm bars: you will likely see your front axle behind your bars as you look down, and your centre-of-mass will be rather central over the wheels. With hands wide, you can push your body back, away from the front axle, but not very far before your arms are straight. On steep terrain, or while fighting an endo for any reason, there won’t be a lot of ‘body English’ to work with.
If you consider this bar-width / range-of-motion dynamic in the context of old-school MTB, downhill racing is instructive. Rigid bikes with perhaps 2” front suspension were raced VERY fast with narrow bars. There was a vogue phase, where chopping bars down was 'in.’ The thing is, it actually worked ok. Frame geometries were steep, tires were small, suspension was pathetic; narrow bars on long stems compensated for top-tubes that were WAY too short. Meaning, with long stems, wide bars would require huge hand movements to steer, and would reduce the broad range-of-motion riders needed to manage their bikes across a broad range of pitches. In effect, arms and legs were the rider’s suspension, and narrow bars were part of the system. As suspension moved to the rear-end, then extended in travel, frame geometry steadily evolved (longer and slacker) and bars became wider and wider. Now, you can observe that pro downhill racers effectively ride the bike in ‘one position’, and don’t really need to move their hips forward and back nearly as much as was required 20 years ago.
GEOMETRY and CONFIGURATION - KNOWN-UNKNOWNS:
The question I’d wanted to answer for years would finally be addressed with my X3 build:
How would a 59cm top-tube with a 90mm stem and ‘slack head-tube’ feel across a wide range of terrain? Would the bike’s steering feel bad?
I didn’t know how this configuration would work out, not least given I ride two wheel diameters on my gravel bikes. I pre-tested the idea on my old Steelwool cyclocross bike (which I raced with a longer and more front-biased body position than the Brodie Romaxs that took over racing duties), using a 110mm stem over the winter, and it seemed pretty good. That stem was 10mm shorter than what I’d previously raced, and my testing was in winter, on snirt roads, which are really well-suited to evaluating stability. However, it was impossible to test a slacker HTA without building a new frame.
Now, to dig into what I know many of you have been keen to see: what geometry did I roll with?
Bikes are for pedaling
For the reasons discussed above, I start with my hip position when developing a frame geometry. A 73 degree seat-angle places my hips where I want them. This means I can get as far forward as I want to be with a zero-offset seatpost, and as far back as I’d every want to be with a 25mm seatpost. I don’t use any ‘odd’ saddles; the Fizik Arione has been on my bikes for years, and is fairly ‘standard’. This element was a firm ‘known-known.’
Stability matters; it’s complicated
Stability is a matter of balancing elements that often pull in opposing directions. Given the variables at play, I prefer 70mm bottom-bracket drop for a multi-purpose, multi-wheel diameter bike.; another known-known. I feel it balances the characteristics I want:
Good pedal clearance when on 650b x 48mm tires, off-road (see more about this dynamic here, here, and here)
Good centre-of-gravity with tires up to about 700c x 42mm. Beyond that, I’d want to go down to 75mm drop (If I intended the bike to be dedicated to large 700c tires).
Good bunny-hoppabilty. The smaller the BB-drop figure is, the easier bunny-hopping is for a given chainstay length. 80mm is noticeably harder to lift than 70, for example. Note: fit I was designing this bike for bike-packing, I wouldn’t prioritize this hop-factor; it’s not possible to hop a heavily loaded bike. I would drop to 75 or 80mm for increased stability.
There’s a trend toward short chainstays on gravel and all-road bikes, which is a carry-over from road. 425mm chainstays are my preference for all-round use. I find it balances all the important characteristics, from climbing traction to descending stability, bunny-hoppability, and drivetrain performance.
If I could, I’d have specified adjustable dropouts, angled to reduce BB height and slacken the HTA when lengthening, and the opposite when shortening. I’ve ridden a 422mm chainstay (demo T-Lab X3), and I like the nimble response it provides for technical riding; yes, I could easily feel the 3mm difference in length.
If I were to incorporate an adjustable dropout, I’d do 425mm / 70mm as a ‘middle position, then 430mm / 75mm as the longest setting, and 420mm / 65mm in the shortest. Note that the shortest would tend to only be used with 650b wheels, and it would increase pedal clearance. The long/low setting would be used with the largest 700c wheels, yielding the highest degree of stability through both lengthening the wheelbase, and bringing the centre of mass back down, closer to ‘normal’.
A nice thing about being able to adjust BB-height and chainstay length together is that you can change transform a long, laid-out hand position that makes hopping the bike really hard to do into one that is significantly easier to.
Stand-over schmand-over?
Top-tube drop is an element I’ve spoken with many folks over the years; most have been concerned about standover height for technical riding. In my experience, it doesn’t matter nearly as much as folks might think; this perception seems to be driven by MTB geometries to a large degree.
I decided to go with 555mm (centre-to-top), which is a slightly lower TT for the X3 than my CX bikes (560mm), but not as low as the carbon Romax: 520mm. It’s a compromise. As you can see from what follows, TT-drop will always be a matter of compromise if you intend to ride your custom bike across a broad range of applications.
If your bike will be ridden with a fixed saddle position, you don’t need much seatpost exposed from a safety perspective. A ‘classic’ road bike seatpost extension is generally fine. However, dropped TTs, which have become increasingly common over the last 20 years, do offer an aero position classic frames don’t: the now-UCI-banned ‘supertuck’ position. Here, the rider sits on the top-tube, and this can be both comfortable and stable when done well. It’s a position I use often on long rides, as part of my energy-conservation strategy.
Dropper posts work best when there’s lots of top-tube drop and associated exposed post. The more post you have extending from your frame, the more travel you can use. Even without a dropper, the lower your TT is, the more you can drop your post, manually, for a steep descent. Again, some folks will never need or want to do this either way, so a lot of exposed post won’t make much difference.
Cyclocross racing and bikepacking impose a few constraints on top-tube drop, but there are some advantages to running considerable drop as well.
For CX, you want your top-tube (TT) to be where your hand is when you dismount and carry the bike, rather than have to reach down to get to it.
The lower the TT is, the smaller the front triangle, and less room to shoulder the bike.
In the context of bikepacking or whatever you want to call it, frame bags need space. I knew, from my carbon Brodie Romax (530mm TT height), that it’s difficulty to fit two large bottles into even a relatively large frame (57cm) when the TT is dropped considerably. I could barely fit my seat-tube bottle in when running my frame bag.
Given cyclocross is very technical, and I’ve never had issues with my TT being too high in races, I knew I could place my X3’s TT as high as on my CX bikes, and I’d not have issue. My 59cm Steelwool had a ‘very high’ TT, and I never once had an issue with it while racing. Running a dropper post down the road, and the overall aesthetic I wanted for the bike wound up driving the spec I landed on, 555mm. At this height, I’d be able to use a short-travel dropper post down the road if I wanted to, and I’d have just enough room to sit on my top-tube comfortably.
Endurance riding doesn’t necessarily equate to ‘comfort fit’
Many of the big bike brands went off on a tangent a decade ago when they started producing ‘endurance road bikes.’ They incorporated increased tire clearances and more comfortable/compliant materials/designs/configurations, while they also increased head-tube lengths. This generated higher handlebar positions, fine for riders who wanted that, a hassle and even deal-breaker for those who didn’t. This trend drove me to have my first custom bike built; I needed a long reach, but a not-long head-tube, in order to get my bars low enough to be comfortable while riding both at speed and over long distances.
I have proportionately short legs for my 6’1” height, so my saddle runs lower than typical. Since I have a proportionately long reach, stock geometries across all categories tend to have head-tubes (HTs) that place my bars too high. This is one of the reasons I’ve run small stock frames in the past, with long stems. Pro road racers have been doing the same thing since the advent of modern ‘compact’ geometry, which came in about the same time as they stopped having access to custom geometry race bikes.
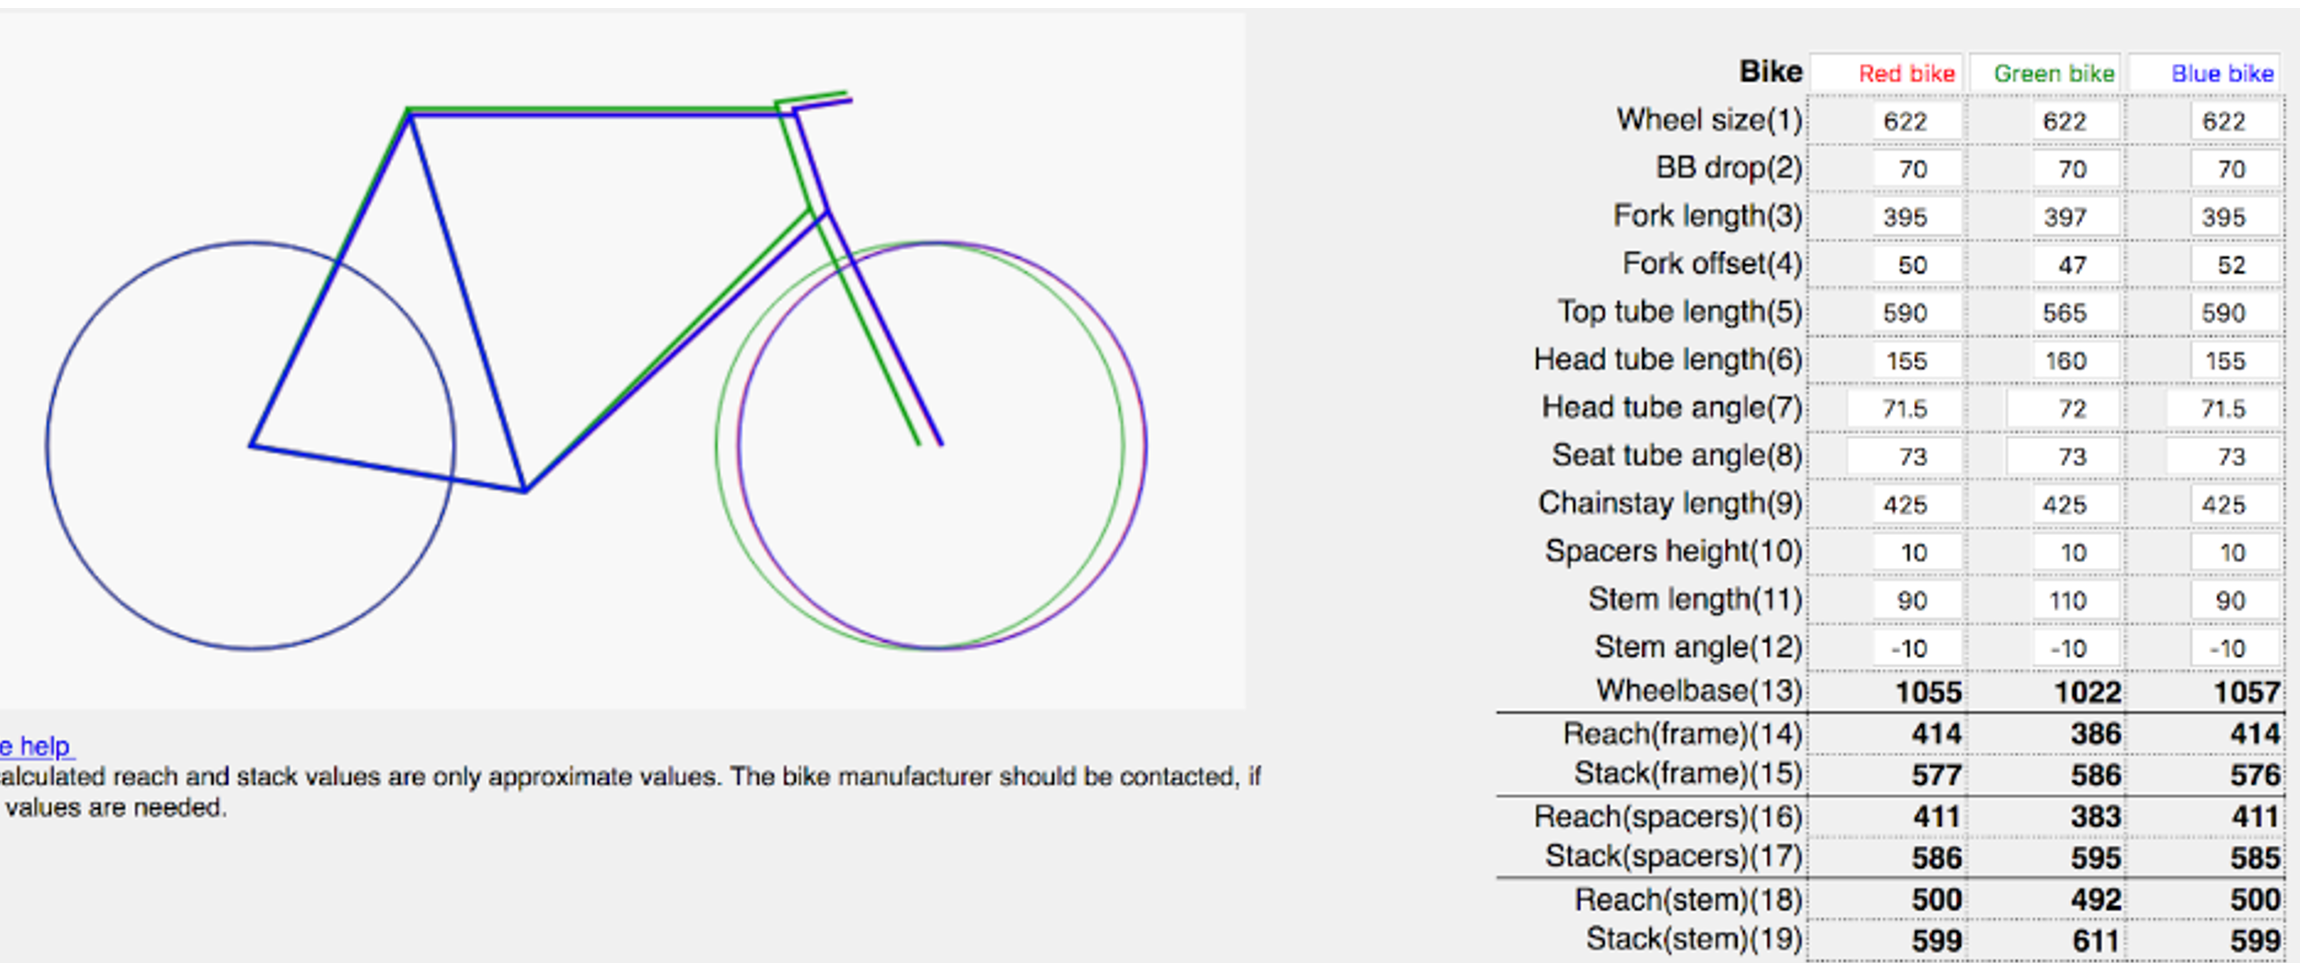
My 56cm CX bikes have 160mm HTs, which position my bars as low as I want for a CX position. For the X3 I wanted to build in the option to run a lower and longer position for more all-road riding at some point, so I dropped the HT to 155m. The geo comparison above superimposes my X3 geometry over my Brodie Romax cyclocross bikes. The green frame is the Romax, the blue is the T-Lab. As you can see, my bar position on the X3 would be almost the same as on the Romax, but my front axle would be 35mm (with 52mm fork rake) further forward, which is significant. With 47mm rake, it’d be 30mm longer in the front-end.
Stability, again. But different.
No one element of a bike’s design and configuration determines stability, obviously. As discussed prior, steering geometry and stability relate to the surfaces being ridden, and pavement calls for different approaches than dirt , gravel, grass, or moon-dust. I wanted this bike to be stable at high speeds on loose surfaces, and I didn’t even think about how it would feel with a 700c x 32mm tire, the smallest I ride. Good, bad, other? Irrelevant, I’d never ride that setup on this bike.
I’ve been happy with the stability of a 73 degree head-tube angle (HTA) when paired with a 59cm top-tube on other bikes. I’ve also been happy with a 72.5 HTA on a 59cm, and 72 on 57cm frames. My suspicion is that the longer a front end is, the steeper a head angle one can use. The upper limit seems to be 74 degrees. This is not uncommon for road bikes, but I aimed to test a slacker HTA approach. We are now into known-unknown territory.
I wanted to port the modern approach to MTB geometry over, to create more of a ‘steering with the hips’ sort of bike than I’d previously had (I can’t get into this here. Suffice it to say that I mean that steering this way is more about moving the hips side-to-side to subtly lean the bike, which generates turning from frame input instead of hand input. This style of riding highlights the nuances of geometric, pneumatic, and ‘real trail). I was never really happy with how my cyclocross bikes handled in mud, and had observed my friend Todd on his custom Firefly ride off-camber mud better than I’d ever seen him do on his old CX bike with a conventional geometry. The slacker front end we designed for his bike worked really well when the bike was leaned over and hunting for traction.
I chose to pair a 59cm top-tube with 71.5 degrees for my HTA, a small change, but one I’d be able to discern against the 72 degree bikes I’d also be riding. It didn’t seem wise to go to the extreme in slackening my HTA, as I wanted to keep the bike polyvalent, versus a full-blown drop-bar MTB.
For reference, my old Cervelo S5 road bike had a 597mm horizontal top-tube length and a really tall head-tube. I had to run a 140mm stem at -17 degrees to get into a workable road position on that bike. The Cervelo’s reach was 405mm, while my T-Lab would be 414mm.
You can do whatever you want with your HTA, but if you don’t select a fork rake in the right range, you’re not likely to be happy. I knew the standard 47mm rake forks had worked well for me on cyclocross bikes with headtubes falling between 72 and 73 degrees. By slackening the HTA to 71.5, using Columbus’ Futura Cross fork, with 47/52mm adjustable rake, would cover the range of rake I’d want. If I was to run a really grippy front tire, like a 650b x 48mm Rene Herse Switchback Hill, on pavement, I might encounter oversteer with the 47mm rake setting. In 52mm rake mode, geometric trail would come down, and the tire would be less likely to oversteer. It would feel more ‘normal’.
I wasn’t able to line up the Columbus fork as the bike was being built, so T-Lab paired the frame with their custom-painted 47mm rake carbon option.
Ultimately, Columbus sent me a Futura Cross fork, which I’ve been riding since winter, 2020-2121. In the third part of this trilogy, I’ll fill you in on how everything came together, and how the bike has performed. Spoiler: IT’S AWESOME!
If you think I’ve gotten anything wrong here, let me know! And if you have questions about the content of this part, or particular things you’d like to see in the next, please don’t hesitate to comment below.